Restoring a WWII Era Battleship Lantern – 5293-L

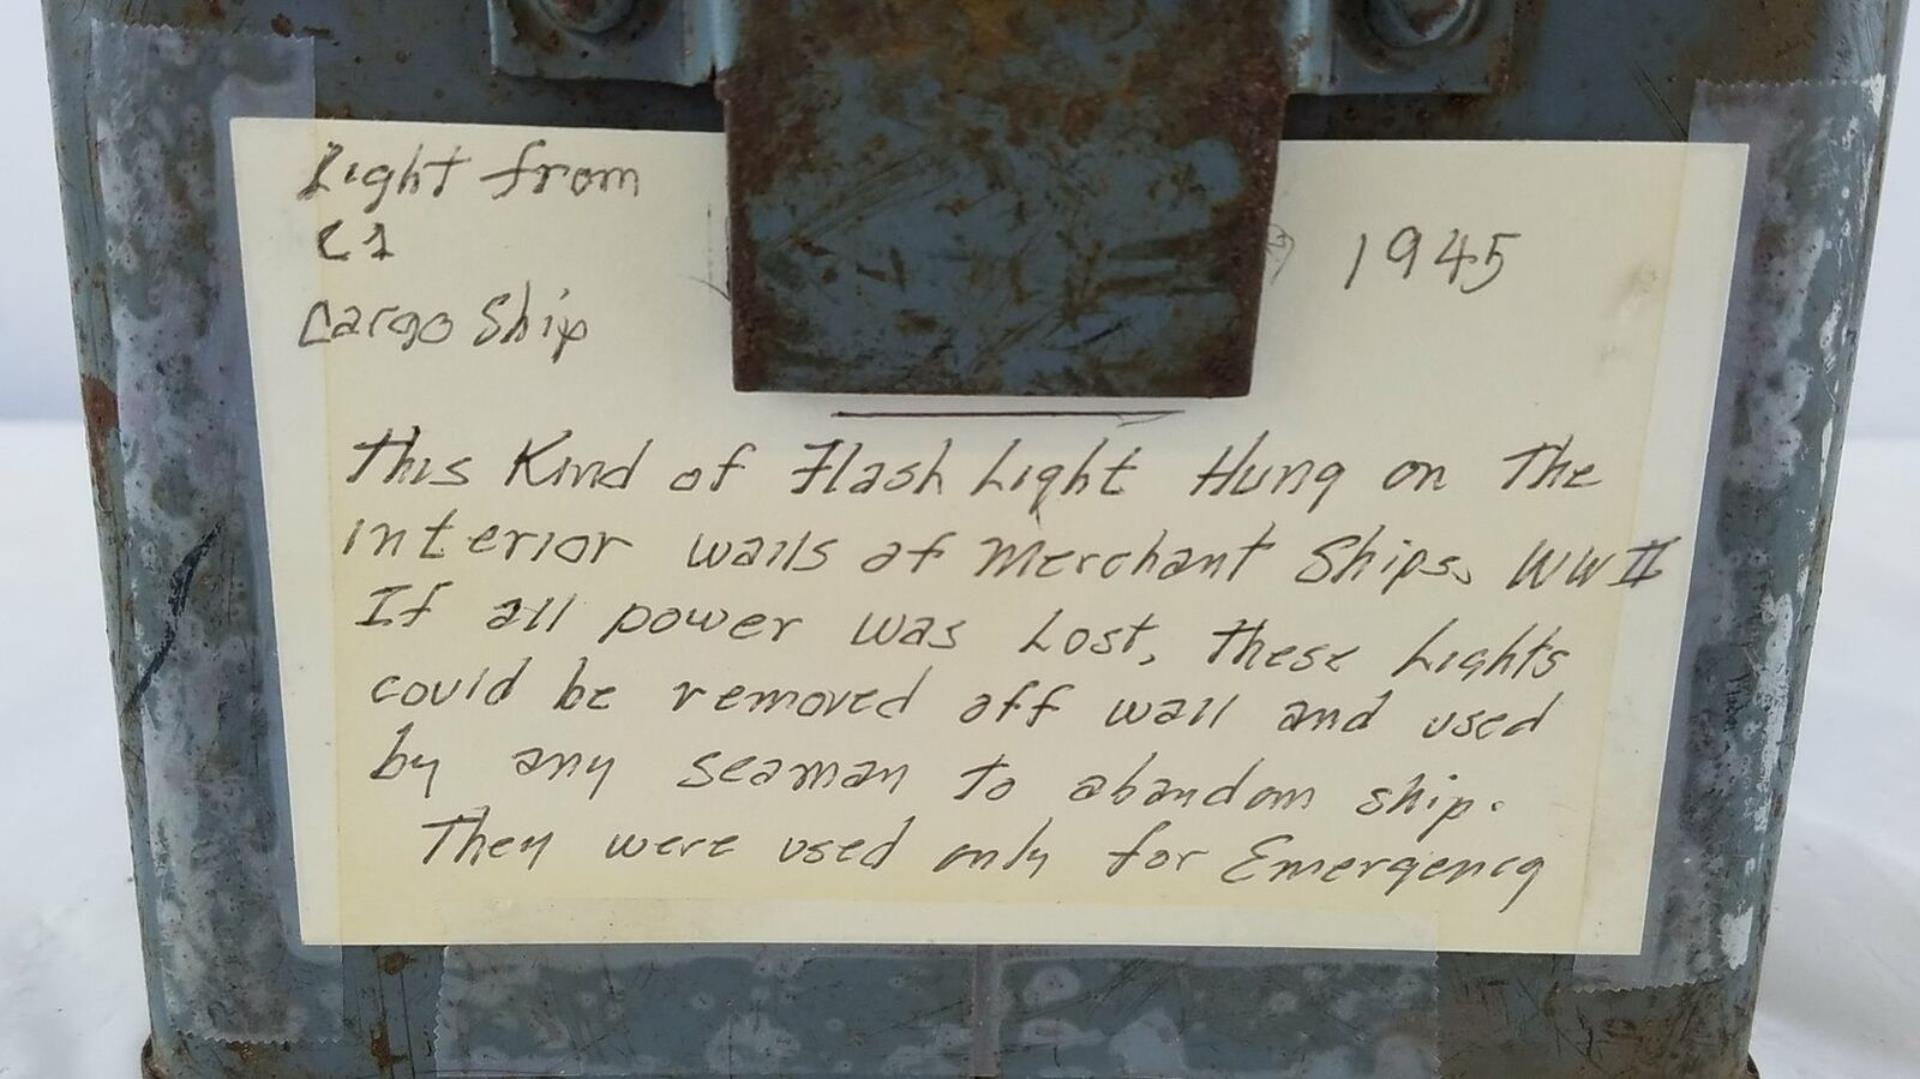
World War II ended 76 years ago, and at this point there are not many surviving service men and woman around to tell the tales of the time. I believe we need to preserve the stories of the past to enlighten future generations to insure history will never repeat itself. When I came across this Battleship lantern from the mid 1940’s at my local Goodwill, I felt it needed to be restored and preserved to tell its story for many more years.

I purchased the light for $20 from the Goodwill, which I felt was a bit overpriced for its condition. However hopefully some of my purchase price is going to a good cause. Researching a 76 year old flashlight proved to be more difficult than you would expect. According to Google, the 5293-L Lantern was attached to the US Navy Battleships and according to the letter that came with the lantern it was also used on cargo and merchant ships.

ORIGINAL LETTER INCLUDED WITH LANTERN
Tools & Supplies you can use

Continue reading “Restoring a WWII Era Battleship Lantern – 5293-L”

Frigidaire Dryer Repair For $20 FFLG3911QW1

There's noting more aggravating than having a fairly new appliance (that is out of warranty) quit working. However there's nothing more satisfying than fixing it yourself and saving $200+ on a service call. I have a 5 year old Frigidaire washer / dryer combo unit and recently the dryer stopped getting hot. The unit continued to spin /tumble, however no heat. The dryer is gas and giving it a good listen there was no attempt to even light the flame. It was time to take the dryer apart!

TOOLS YOU CAN USE
71n-lwGiykL._AC_SL1500_

Some type of screw gun or drill with a Phillips bit set. I personally like this Makita, but never the less a cordless drill or screw gun would be helpful.

61cyqZhSgsL._AC_SL1000_

A stubby screwdriver set is also very helpful they are so inexpensive and available for $10 at Amazon like this one.

We need to test some of the parts. Any digital multi-meter with an ohms / continuity scale will work just fine. They are very inexpensive  $25 at Amazon

Time to take the unit apart

I am going to describe to the best of my ability how to take this dryer apart, however there are some great YouTube videos that explain it better than I can. I still recommend you read my description as I will tell you what my personal experience was during the process.


  • First disconnect the power
  • Shut off the gas line
    I did not disconnect mine, but it might be a good idea to do so.
  • Shut off the water lines
    Again, I left mine attached, but it might be a good idea to disconnect
  • Remove the drain hose from the sink or stand pipe
    Guess what, I left mine connected.
  • Remove the dryer vent (use the stubby screwdriver)
  • Now locate the dryer motor access cover and remove the two screws that are holding it to the dryer. You should see the motor, belt and belt tensioner.  If you have never done this before take a quick picture of how the belt is set around the motor

Snag_6bbbd011
  • Push the tensioner to the left, this will give the belt some slack and allow you to remove it from the motor
fssfle3911q_angled_view

There are 4 screws on the rear of the unit (RED ARROWS) remove them (it will make life a bit easier later.

Work your way to the front of the unit. There are two screws holding a white trim cover on - (YELLOW ARROWS) remove them and set the cover aside

Under the trim cover remove the two screws that hold the control panel on, (BLUE) arrows. Then push down on the control panel to remove. *** IMPORTANT *** Disconnect the dryer door switch.

Next there are two screws directly below the screws you just removed. They are holding a silver plate on. Just take the top two out. No need to remove the entire silver plate.

WE ARE GOING TO TAKE THE DOOR OFF

Two more additional screws hold the bottom of the door on. remove them.

Next work your way to the top front of the dryer. 4 screws need to be removed. Now the door can come off! Get some help. The DOOR IS HEAVY!

Ok we're in!

There is a little black piece of rubber in the top center of the dryer. Its called a drum stop and needs to be removed.

Now the entire drum needs to come out. You could use a helper with this step. The drum sits in a bearing at the back of the dryer wall. Its like a ball and socket. Lift up on the back of the drum to remove the ball from the socket. (this may take a little bit of effort.)

Slide the drum out (don't catch the belt on anything!

WHAT PARTS TO TEST
dryer

This is what the inside of the dryer looks like with the drum removed. Kind of simple, don't you think?

Lets get to testing, all the way in the back on top (RED ARROWS) are two thermal fuses. This is the most common part to die. Start w/ one of the fuses and remove one wire. Then check across the fuse (both legs) with your multi-tester set to continuity. A BEEP = GOOD!

The first part I tested was bad! Thermal limiter 137032600, I believe they sell everything at Amazon and was able to pick this one up for $20

Moving down the line, be sure to test the flame sensor as well (Aqua Arrow) same procedure here, pull one of the wires off and check for continuity.

The yellow arrow points to the leads for the igniter. Use the OHMs setting on the meter to see if there is any resistance. If is shows OPEN (or infinity) its bad.

Same goes for the gas valves, check for resistance.

CLEAN ME!

The reason my dryer failed was because of lint buildup. Over the years lint collected behind the drum and it looked burnt. There was lint in the door, the sides the exhaust fan, pretty much everywhere. Use a vacuum to clean the entire dryer before you put it back together. don't forget the back of the drum.

IMG_9008 (Copy)
IMG_9009 (Copy)

A couple of closing thoughts

  • DON'T MOVE THE DRYER AROUND WHILE ITS APART! The sheet metal is so thin it will bend.
  • The door was hard to get back on because my dryers sheet metal shifted a bit.
  • The BELT GOES GROOVED SIDE DOWN. While you are in there you may want to order a replacement belt.


Thank you for reading my blog,
Joe


Restoring The 1920’s Everedy Gear Top Bottle Capper

Covid19 has pretty much left me trapped in the house over the last few months. Needing to keep busy I started to clean out the basement, selling some stuff on Ebay while tossing the rest out in the trash. I did come across this Everedy Gear Top Bottle Capper under a table gathering dust and rust and decided it would be a good restoration project. Restoration would be very easy as there are only a few parts and the capper was simple to take apart.

Tools you can use

Since the bottle capper is made of cast iron and had some serious rust, I decided to go with a wire brush to remove the dirt and prep the surface for paint.

wirebrush
$9.00 Brush set


Wire wheel brush set – About $9 at amazon


Continue reading “Restoring The 1920’s Everedy Gear Top Bottle Capper”

The Superior Instruments Dynarometer 1260 Vintage Electronics Restoration

I am still trying to figure out the back story on this restoration project. What I do know is this is a Dynarometer Model 1260, under the bezel of the meter movement is says Superior Instruments Co, New York NY made in USA. I am not sure if these were sold as a kit or even the exact model year. If I was to guess I would say 1950’s give or take a few years.

A friend was tossing this out so I adopted it and decided to keep it from the landfill. It was dirty and quite rusty. After a through examination to make it operational again would be virtually impossible, however restoration as a piece of art would be the second best thing.

TOOLS YOU CAN USE

Continue reading “The Superior Instruments Dynarometer 1260 Vintage Electronics Restoration”

Leaky Washing Machine? Check the Pump! Replacing Maytag 35-6780 Drain Pump.

Washing machines are just like any other durable good we buy for our home, eventually they will wear out and break down. Once this occurs we have three choices. 1. Replace the Washing Machine with new, 2. Call the repair man or 3. Just fix it yourself. According to an article I read in Consumer Reports once the machine hits 5 years you may consider tossing it for new, and at 10 years its a dead man walking.  Mine had a leaky pump.

I currently have a Maytag MAV4755AWW that is around 15 years old, during a recent load of laundry water began leaking from the bottom of the machine. Was this the beginning of the end for my reliable Maytag washer? After a quick inspection it appeared that the leak was coming from the washer pump.

The big question is it worth while to replace the pump or simply replace the washing machine. In this case the pump is under $50 so well worth the time it takes to do this DIY repair!

Continue reading “Leaky Washing Machine? Check the Pump! Replacing Maytag 35-6780 Drain Pump.”

Weekend Project – Clean The Echo GT-2000 Exhaust Port.

I purchased my Echo GT-2000 trimmer almost 18 years ago and it has served me well. I’m usually if it ain’t broke don’t fix it kind of guy and haven’t done any maintenance on my GT-2000 ever. For the last 18 years its been pull the cord and start on the first try! That is until this season. I was able to get the trimmer running but it would stall the instant I would throttle it up.

Thinking to myself this is the end for the GT-2000, I actually started to look for a replacement. I looked  in Lowes and Home Depot but they weren’t selling the Echo brand. I decided to take a chance on fixing the unit and began looking for possible causes.

The Exhaust Was Oily and Black

Continue reading “Weekend Project – Clean The Echo GT-2000 Exhaust Port.”

Why Brick & Mortar stores are suffering.

As a company grows it forgets how to deal with its two most important assets. The first being the customer and second its employees. In a mom & pop scenario the principals of the business can deal directly with their customers and empower their employees to do the same in their absence. However at large Brick & Mortar corporate stores many employees and even local store managers are unable to effectively help their customers.

My recent Brick & Mortar Experience.

My Kenmore clothes dryer of 19 years is on its last leg, and as much as I would love to do a “weekend project” blog posting on repairing it, I’m afraid its just not worth the time or money. I headed out to purchase a new unit.

First Stop – Brick & Mortar Sears

I know Kenmore (like most of the appliance brands today) are just name plates, however since I had good luck with the last one I figured I would be brand loyal.  My Wife and I strolled around the appliance center in our local sears and found a Kenmore 8.8 Cu ft dryer that looked like it would do the job. A sale associate approached and we began the purchase process. Continue reading “Why Brick & Mortar stores are suffering.”

BONDO – Its not just for 1970 auto body repair!

If you’re as old as I am you may remember some of the auto body repair techniques of the late 70’s and early 80’s. It was an era of body fill ,shape and repair rather than today’s replace replace replace.  While Bondo is still used in the automotive industry there are so many other uses for this stuff its ridiculous.

What I like most about Bondo is the fact it will not harden in the can and you are able to store it almost indefinitely. The other amazing quality about this stuff is it hardens  and is ready for sanding and paint in under 15 minutes.

Repairing The Porch With Bondo!

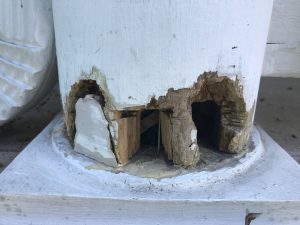
Recently I noticed the columns holding up my covered front porch were showing signs of rotting at the very bottom. Apparently some of the caulking around the top of the column weathered and was allowing moisture in the pole and causing rot.
Continue reading “BONDO – Its not just for 1970 auto body repair!”

Quick Fix – My bottom freezer door is not sealing on one side.

I have a typical KitchenAid French door refrigerator with a bottom pull out freezer. Its about 10 years old and has been very good at keeping our food fresh. My wife would say that the freezer is on the small side, and I think it could have been a little bigger myself. Fast forward 10 years and it would appear that this exact model is still being made and sold under many different brand names. Unfortunately we are having a freezer door issue.

Freezer Door Issue

Last night I opened the freezer and there was frost building up on the left side. After a quick inspection I noticed the door was not fully closing on the left. There was about 1/8″ gap at the top of the door and the seal.

After an exhausting Google/Youtube  search I kept coming up empty. Search results had shown fixes for some bottom draw freezers, mostly GE models. These units had set screws and adjusters to help align the door, my unit has no such adjustment.

I then started trolling the appliance fix-it sites and message boards and read old posts stating that the freezer draw may need new rails, or the device at the back of the rail that pulls the door firmly closed cold be broken. On my unit when the draw has about 2″ to go mechanisms on the end of the rails pull the door tightly closed.

My Troubleshooting Steps

Continue reading “Quick Fix – My bottom freezer door is not sealing on one side.”

Weekend Project – Keep your lawnmower humming with some basic maintenance.

Its that time of year again, the trees are budding, the flowers blooming and the grass is getting tall. If your like most you will probably roll the lawnmower out of the garage, top off the fuel and begin cutting.

Wait, not so fast. There are a few easy maintenance items you can  do yourself to keep your lawnmower humming like new all season long.

Change the oil

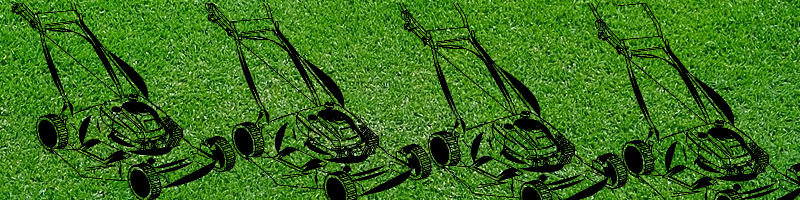
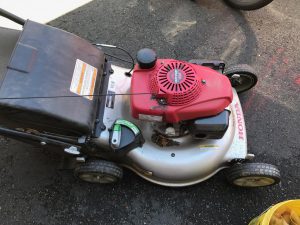
This is probably one of the most important maintenance items you can perform at each season. Lawnmowers run in a hostile dusty environment, and the oil can be easily contaminated.  Your lawnmower manufacture will recommend the frequency of oil changes you should preform. I like to do it every spring before the first
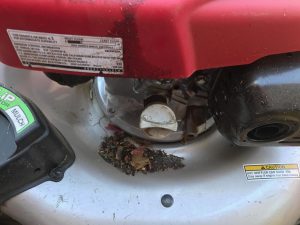
 cut.

My lawnmower is a  Honda walk behind. This unit uses a common fill / drain hole.  The first step is to wipe any dirt off the dipstick, then unscrew and place the dipstick cap on the side.

Continue reading “Weekend Project – Keep your lawnmower humming with some basic maintenance.”